Written by: Andrew Forrest
Updated: July 2025
Unexpected injuries or health issues can occur miles from help, so preparation is essential. Whether you're tackling the National Three Peaks Challenge (Ben Nevis, Scafell Pike, Snowdon in 24 hours) or the Yorkshire Three Peaks (Pen-y-ghent, Whernside, Ingleborough in one day), having basic first aid knowledge and the right supplies gives you the confidence to manage common problems such as blisters, sprains, cuts, dehydration, or exhaustion.
In the mountains, conditions and terrain are unpredictable - a simple slip can cause an injury, or a hot day can quickly lead to dehydration. By carrying a first aid kit and understanding basic treatment steps, you can address minor issues before they become major problems and keep your adventure on track.

In this guide, we'll cover first aid essentials for Three Peaks walks, including how to spot and treat common hiking ailments and environmental
injuries. We'll also provide a checklist for a hiking first aid kit.
This page contains affiliate links. If you buy products or services via these links, we may earn a small commission at no cost to you. If you are thinking of buying, please use our links, as it helps support our website and YouTube channel.
The information provided here is intended for general educational purposes only and should not be regarded as medical advice or a substitute for professional healthcare. If you are experiencing a medical emergency or serious symptoms, seek immediate assistance from a qualified medical professional or contact emergency services. Always consult your GP or a healthcare provider for personalised medical guidance and treatment.
Before beginning any exercise programme, especially if you are new to exercise, returning after a break, or have any existing health concerns, you should consult with your GP or a qualified healthcare provider. Always listen to your body and stop immediately if you feel discomfort, dizziness, or pain.
Listen to your body and don't ignore problems. One of the key rules of first aid while out hiking is to address problems as soon as they appear. For example, if you start feeling a 'hot spot' on your foot (a precursor to a blister), stop and treat it immediately. Don't push on hoping it will disappear - it won't.
Remove your boot, dry your foot, and apply a blister plaster (such as Compeed) or a piece of moleskin padding to the affected area to reduce friction. Taking a few minutes to care for a hot spot may help you prevent a painful blister that might force you to give up the hike later.
If you twist an ankle or suffer a sprain, resist the urge to limp along in agony for miles. Stop and evaluate the injury. Can you put weight on that foot at all? If it's minor, you might apply a compression bandage from your first aid kit to stabilise the ankle and use your walking poles as makeshift crutches to take weight off the injury. Move slowly and carefully.

If the sprain is severe or you suspect a serious injury, it's wise to cut your walk short rather than risk causing further damage.
Continuing on a badly injured ankle could turn a moderate sprain into a much worse injury. Remember, the mountains will be there for another
attempt once you heal - your safety comes first.
Pay attention to signs of dehydration and low blood sugar as you exert yourself. Early signs of dehydration include headache, dizziness, and dark-coloured urine, while low blood sugar (hypoglycaemia) may cause you to feel light-headed, shaky, or nauseated. The solutions are usually straightforward: drink fluids and consume some quick calories (like an energy bar or glucose gel) as soon as you notice these warning signs.
Also, take a break from the sun if you can find some shade. Many bigger problems are preventable simply by listening to your body's signals and responding quickly. Plan to take regular snack and water breaks, don't try to power through the entire challenge without pausing.
For more serious medical issues, such as a team member experiencing severe chest pain, signs of a heart attack or stroke, a serious fall with a possible fracture, or a serious allergic reaction, you must implement emergency procedures immediately. This involves stopping, ensuring the person's safety and warmth, and calling for emergency assistance (in UK mountains, dial 999 and request Police and then Mountain Rescue).
Situations such as heat stroke (severe overheating) or anaphylaxis (a life-threatening allergic reaction) go beyond basic first aid and require swift professional help. Preparation and prevention are vital.
Move carefully on uneven terrain to prevent falls, carry any personal medications (such as inhalers or epinephrine injectors) you may need, and do not hesitate to turn back if conditions or injuries make continuing unsafe. It's better to be safe than risk further danger by pushing on.

Ultimately, prevention is the best form of first aid. Many common hiking injuries can be prevented or reduced through sensible precautions.
Watch your footing on uneven, slippery ground to avoid trips and falls. Dress in layers and use suitable rain and wind protection to prevent
hypothermia (discussed below) or overheating. Take regular breaks to eat and rehydrate so you don't become exhausted.
Pay attention to each other in your group - often others will notice you're struggling before you realise it. By being proactive and cautious, you can often prevent issues before they arise.
If your first aid knowledge is weak, there are many good first aid videos on YouTube you can watch to learn and then improve on the basics.
Hypothermia is a risk on the Three Peaks, even in unexpectedly mild weather. If a hiker gets wet, exposed to wind, or simply becomes exhausted, hypothermia can occur. It occurs when your body loses heat faster than it can generate it, resulting in a drop in core temperature. Importantly, it doesn't need to be freezing for hypothermia to happen. Even at around 10°C (50°F), dampness and wind can cool the body enough to trigger it.
Early signs include uncontrollable shivering, numbness or tingling in the hands and feet, clumsiness, slurred speech, and strange behaviour (the person may become withdrawn, confused, or apathetic).
If a member of your party appears unreasonably cold, disoriented, or is stumbling, you must act quickly. Warm and shelter them immediately. Find a spot out of the wind, such as pitching an emergency bothy shelter or huddling behind a dry-stone wall, and remove or shield them from any wet clothing.

Add extra layers to the individual, like an insulating jacket, a dry hat, and gloves - anything to help warm them up. Wrap them in an
emergency foil blanket or bivvy sack from your kit to reflect heat back to the body. If they are able to drink, offer a warm, sugary beverage
or high-energy food; consuming calories will help generate internal heat. Sipping a sweet, warm tea from a flask can work wonders.
Monitor the person closely. If they only have mild hypothermia, these measures (warmth, wind protection, energy intake) should lead to improvement, and you should see shivering subside and their mental state improve as they warm up.
However, severe hypothermia is life-threatening and requires emergency help. Never ignore the warning signs; it's much easier to prevent hypothermia than to treat a severe case on the mountain.
Prevention tips: Wear your waterproof jacket and trousers before you're soaked to the bone, and put on gloves and a warm hat when the wind picks up. Don't sit around in sweaty, damp base layers during long rest stops - you'll cool off rapidly. Keep moving or stay insulated during breaks.
Always remember the formula: wet + wind = chill. Even at 10°C on a blustery summit, a drenched hiker can become hypothermic. Plan ahead with appropriate clothing, and always have an emergency shelter or at least a waterproof layer to break the wind.
At the other end of the spectrum, hot weather can cause hyperthermia, which occurs when your body overheats. In the context of hiking, this often begins as heat exhaustion and can develop into the more serious heat stroke if not treated. Early signs of heat exhaustion include heavy sweating, thirst, headache, nausea, muscle cramps, dizziness, and fatigue.
The person may look flushed and feel very hot, but their skin will be cold and clammy to the touch due to excessive sweating. If someone in your group shows these symptoms, it is a warning that they need to cool down and rehydrate immediately.

Heat stroke is a life-threatening condition that can develop if heat exhaustion is not treated. In heat stroke, the body's core temperature
rises to dangerous levels. A key sign is that the person stops sweating, and their skin becomes hot and dry, even though they are overheated.
Confusion, irritability, stumbling, and eventually collapse or unconsciousness can occur.
Heat stroke is a medical emergency. If you suspect someone has heat stroke (hot, dry skin, altered mental state, possible collapse), you must seek emergency help immediately. Without prompt treatment, heat stroke can be fatal or cause serious organ damage.
To help prevent heat-related illnesses on a Three Peaks challenge, which is often attempted in summer conditions, be proactive about sun and heat protection. Wear a hat and lightweight, light-coloured clothing. Use sunscreen to prevent sunburn (sunburn reduces your body's ability to cool itself).
Most importantly, stay hydrated by drinking water regularly before you become very thirsty, and include electrolytes, such as sports drinks or electrolyte tablets. I use the SIS ones, and have done for many years during long exertions to replace the salts lost through sweat. There are many available, but I find these easy on the stomach. They are electrolytes only - don't rely on these for energy during your walk.
Plan a slower pace in high temperatures; it's not worth pushing hard for a 12 or 24-hour target if your body is overheating. Take more frequent breaks in the shade (or create shade with an emergency foil blanket or even your backpack) when the sun is intense. If you pass any water sources, I always find dipping a buff (or similar) and then draping it wet around my neck cools me for a while. Similarly, try soaking your hat.

If you notice someone overheating, have them stop and rest in a cooler spot. Move them out of direct sun. Even if shade is scarce, you can
improvise shade with a jacket or emergency blanket stretched on trekking poles. Have them lie down and, if possible, elevate their feet slightly
(to improve blood flow to the core).
Cool the person by splashing water on their skin and fanning them to promote evaporative cooling. Loosen or remove excess clothing. Rehydrate them with water or, ideally, a drink containing electrolytes. Cooling down and rehydrating usually brings improvement within 30 minutes.
The skin should start to feel cooler, and the person's alertness should improve as their body temperature drops. If they do not improve after 30 minutes of rest and cooling, or if heat stroke signs (no sweat, confusion, fainting) appear at any time, this is a red-alert situation - call for emergency medical help. While waiting, continue aggressive cooling (douse them with water, keep fanning, use cold packs on armpits/neck if available). Heat stroke requires professional treatment; do not delay if you suspect it.

Always err on the side of caution when it comes to heat illness. It's better to shorten or postpone a hike than to risk heat stroke.
Remember that on a calm, sunny day, the valleys may feel manageable, but the climbs can be brutal under direct sunlight, so plan accordingly.
Pacing, hydration, and shade are your best tools to beat the heat.
Blisters truly are the bane of long-distance walkers. These fluid-filled pockets form due to friction, and on a Three Peaks walk, with 20-25 miles of walking, your feet are prime candidates. The best cure is prevention.
Start with good-fitting, well-broken-in boots or trail shoes - never attempt a Three Peaks challenge in brand-new hiking boots. Wear quality hiking socks (many prefer merino wool or moisture-wicking synthetic blends) and consider wearing a thin liner sock underneath to reduce friction.

If you already know you tend to develop blisters in certain spots (heels, toes, etc.), pre-tape those areas on the morning of your walk.
Many hikers use zinc oxide tape or Leukotape on blister-prone areas before setting out on their walks. Another trick some use is applying a
lubricant like Vaseline to the feet to reduce friction. Everyone is a bit different, so through training hikes, learn what works for your feet.
I know I have issues with my feet, and in the main, a lot of my problems have been solved by using the correct insoles for my boots or walking shoes. There are many available that help with various foot types and generally provide better cushioning and stability than the insoles that come with the boots.
Once you're on the hike, pay close attention to your feet. At the first hint of a hot spot - a rubbing, burning sensation on the skin - stop and address it. It's far better to take 5 minutes to tend a hot spot than to be crippled by a full blister later. When you notice a hot spot, apply a blister plaster (such as Compeed) or a piece of moleskin padding cut to cover the irritated area. This cushions the spot and prevents further friction. Don't try to be tough and 'push through' without stopping; you will regret it a few miles later when a minor hot spot turns into a large blister.
If a blister has already formed, you have a couple of options. For a small, mild blister that isn't too painful, it's usually best to leave it intact. Cover it with a blister plaster or moleskin to protect it, and let it heal on its own. The unbroken skin over a blister acts as a natural bandage and barrier against infection.
If you have a large or extremely painful blister that looks likely to burst on its own, you may choose to drain it safely to relieve pressure. To do this, first sterilise a needle or safety pin by holding it in a flame for a few seconds or use an alcohol wipe from your first aid kit. Gently pierce the edge of the blister, not the centre, and let the fluid drain out. Once drained, do not remove the skin; leave that flap in place, as it will protect the tender new skin underneath. Apply an antiseptic ointment to the area, if available, then cover the blister with a clean blister plaster or a sterile dressing secured with tape.
Keep a close eye on any popped blisters for signs of infection. Clean the area with antiseptic wipes or saline solution when possible, and re-cover it with a fresh bandage daily. If you are in the middle of the hike and need to keep going, you can improvise with what you have: some hikers swear by duct tape as an outer layer over a bandaged blister. The slick surface of duct tape can reduce friction against your skin, such as when wearing socks. Do not apply duct tape directly onto your skin or an open blister, as it can cause severe pain when removed and may also cause further skin damage. But over a layer of gauze or moleskin, it can help keep everything in place if you've run out of proper blister plasters.
At the end of your Three Peaks challenge, be sure to clean your feet thoroughly and apply antiseptic and fresh dressings to any broken blisters. Drain any new large blisters that have appeared (using the sterile technique described) and keep them clean. Maybe even treat your feet to a massage.

If you develop multiple bad blisters, take it as a learning experience: it likely means something was off with your footwear or sock choice,
or that you didn't stop early enough when you felt a hot spot. Adrenaline and determination during the challenge might carry you through the
pain in the moment, but you don't want to be nursing infected blisters afterwards.
For a more detailed tutorial, see our dedicated guide on Preventing and Treating Blisters for Hikers. Take care of your feet out there, and they'll take care of you!
While walking through grassy, bracken, or heathery areas, especially in the warmer months, you may encounter ticks. Ticks are tiny blood-sucking arachnids that live on deer, sheep, and other wildlife, and they can latch onto humans who brush past vegetation - they basically look like very small spiders. The good news is that the Yorkshire Dales isn't known as a major tick hotspot, and the well-maintained footpaths of the Three Peaks routes mean you're not too likely to pick up ticks if you stay on the main trails.

However, ticks are found throughout the UK countryside, so it's wise to stay tick-aware and take some simple precautions. You want to come
away from your Three Peaks challenge with great memories, not an unwanted little passenger attached to your skin! They are generally reddish,
dark brown and black in colour. They are very small, so not the easiest to spot, especially when unfed. Unfed, they are about 4mm long, but once
they have fed on your tasty blood, they can swell to the size of a small pea.
To reduce the chance of getting a tick bite, cover up in areas prone to ticks by wearing long trousers and shirts, especially where livestock or deer are present. Tuck trouser cuffs into socks to prevent ticks from crawling up. Use an insect repellent effective against ticks, with DEET being most effective. Stick to footpaths to avoid long grass and bracken, where ticks tend to hide. Light-coloured clothing helps spot ticks more easily, allowing you to flick them off early.
Despite your prevention efforts, a tick might hitch a ride. Ticks are tiny (nymphs as small as a poppy seed) and often painless, so inspect your body regularly. Perform tick checks during rest breaks and after hikes, focusing on warm, sweaty areas like behind your knees, around the groin and waistband, under the arms, sock line, hairline, and neck. Ticks crawl upward to find cosy spots, so check all over. If you notice a small lump, examine it closely, as it could be a tick attached.
If you find a tick latched on, don't panic. It typically takes 24-48 hours for a tick to transmit Lyme Disease, so prompt removal is key. Avoid yanking it, burning, or using chemicals, as these can increase disease risk.
To remove a tick safely, use a proper tick-removal tool (often called a tick twister or tick key) or, as I do, a pair of fine-tipped tweezers. Grab the tick as close to the skin as possible, essentially by the head/mouth parts. If using tweezers, grip firmly without crushing the tick's body. Then pull straight upward with steady, even pressure. Do not twist or jerk suddenly, as the tick's head might break off under the skin. It may take a slow, constant pull to get the tick to release - patience is key. The aim is to pull the tick out cleanly, head and all.
Once the tick is removed, clean the bite with an antiseptic wipe or soap and water. Wash or sanitise your hands afterwards. Properly dispose of the tick by sealing it in a plastic bag or tape, flushing it, or wrapping it in tape and binning it. If desired, save the tick in a labelled bag with the date and location of the bite for testing, though this is often unnecessary unless symptoms develop.
Ticks can carry diseases, primarily Lyme Disease caused by the Borrelia bacteria. Not all ticks are infected; they typically need to be attached for several hours to transmit bacteria. Your risk from a single bite is low, but vigilance is advised.
The main sign of Lyme is a 'bull's-eye' rash called erythema migrans, appearing 3-30 days after the bite. It starts at the bite site, expanding outward, sometimes clearing in the centre. Not everyone gets this rash, especially on darker skin, where it may look like a bruise.
Early Lyme also causes flu-like symptoms, such as fatigue, headache, fever, swollen glands, and muscle or joint aches. If these appear 1-2 weeks after a bite, see a doctor. Lyme Disease is treatable with antibiotics, especially if caught early.
If you notice a spreading rash or flu symptoms after a hike, inform your GP about the tick bite. Antibiotics can prevent serious complications. Stay alert, take precautions (cover up, use repellent, check for ticks), and handle ticks properly to reduce your risk.
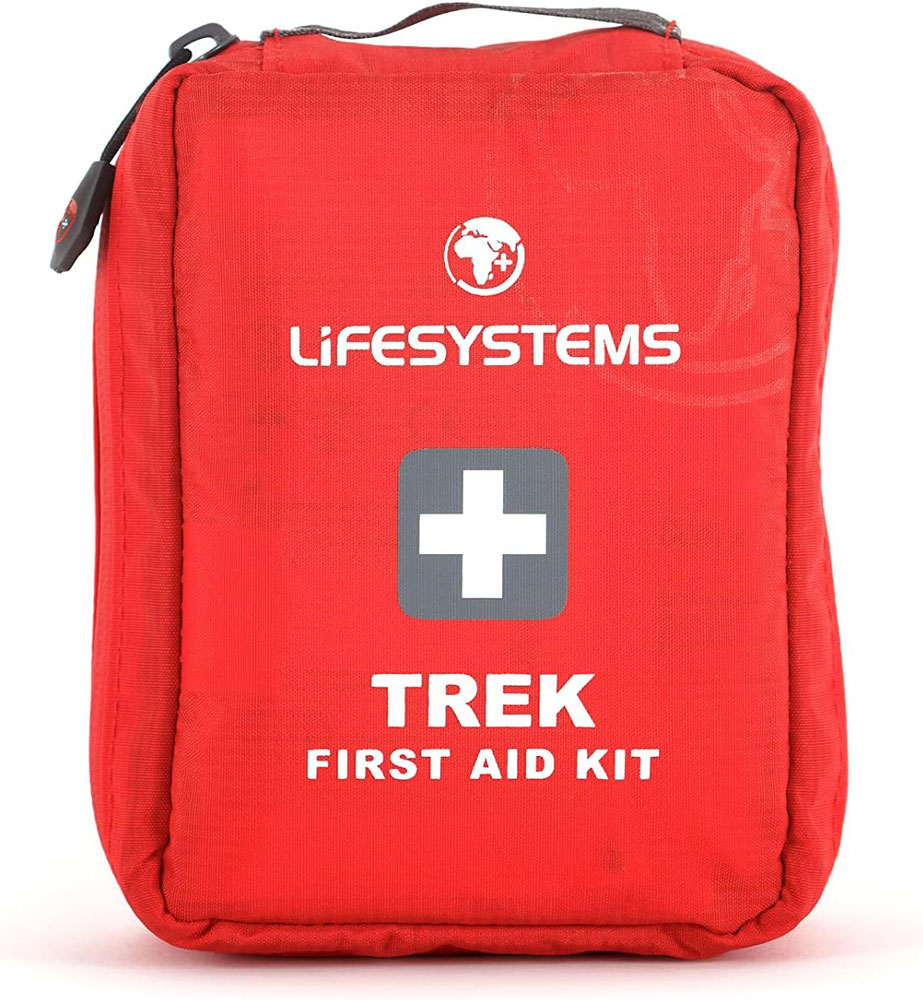
Every hiking group attempting the Three Peaks should carry at least one first aid kit. Often, individuals take their own, and then there is a 'Group Kit' that includes the lesser-used or heavier items. You can assemble your own or buy a pre-made one and customise it.
If you do not have a first aid kit, there are many you can buy online like the one below, and then just tailor it towards your needs:
 |
 |
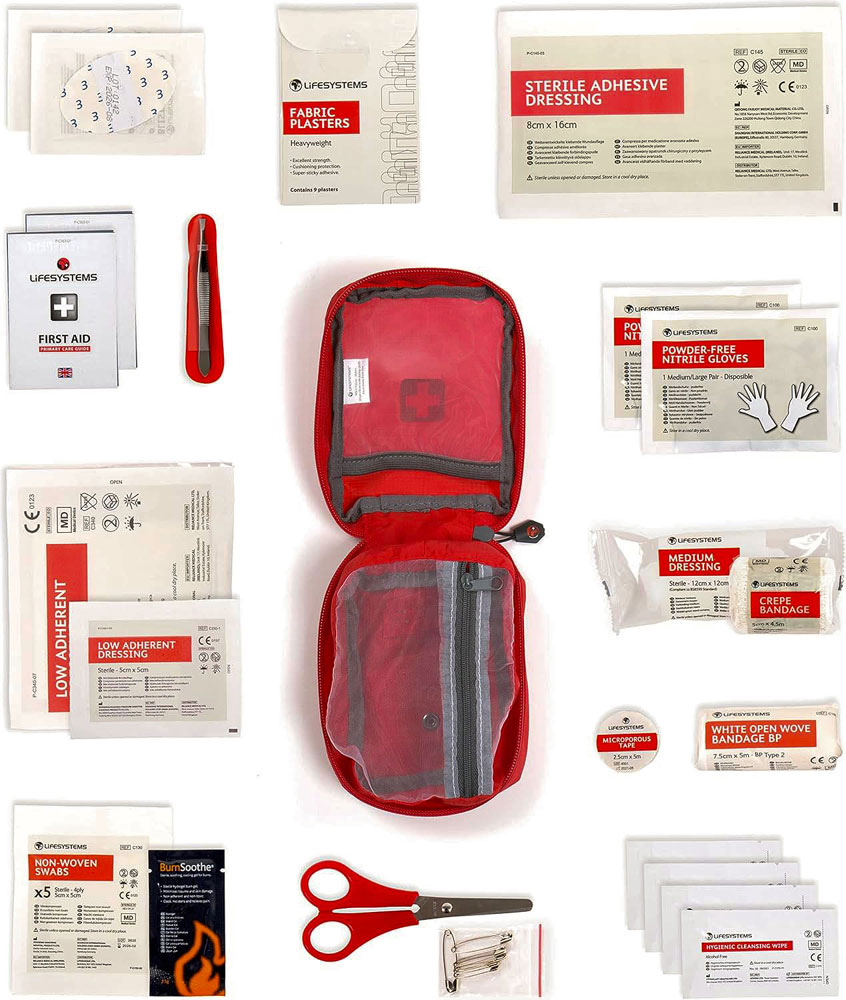
Aim for a lightweight kit that covers a wide range of potential minor injuries and ailments. Below is a checklist of essential first aid items to include:
For a detailed breakdown of these supplies and tips on assembling your kit, check out our full article on how to put together a
First Aid Kit for Hikers.
Along with the general supplies listed above, remember to bring any personal medications you or your teammates might need. This includes items such as inhalers for asthma, insulin or glucose for diabetes, EpiPens (epinephrine auto-injectors) for those with severe allergies, or any other daily prescription medications. Carry enough for the duration of the challenge (plus a little extra in case of delays), and keep them in waterproof packaging. I generally keep my first aid kit in a small dry bag. It depends on the size of your first aid kit, but my 2-litre dry bag can hold my first aid kit, spare compass, and headtorch.

Author's first aid kit along with some of the contents
Aside from the first aid kit itself, there are a few essential safety items you, or your group, should pack whenever you undertake a serious mountain challenge, such as the Three Peaks. These items aren't strictly part of first aid, but they can be lifesaving in an emergency and should be in your rucksack:
This is a compact, lightweight shelter that can protect an injured or exhausted person from the elements. A bivvy bag is essentially a waterproof emergency sleeping bag that traps body heat, and a bothy bag is a small, tent-like group shelter you can pull over yourselves. If someone is hurt or hypothermic, getting them out of the wind and rain is crucial.
I always carry a lightweight bivvy sack at the bottom of my pack; it weighs almost nothing, and it can keep a casualty warm and dry until help arrives. Hopefully, I'll never need to use it. Some first aid kits do come with an emergency blanket/foil, but I do find these are quite flimsy. I would advise spending a little extra and getting a lightweight bivvy sack that will offer more protection. If you wanted to take more protection, the next step up would be to take a survival shelter, which is often available in two-man and four-man versions.
If your Three Peaks schedule goes awry or an incident forces you to stop for a long time, you could find your broad-daylight hike turning into a nighttime adventure. A head torch is an essential piece of kit for any mountain walk, but consider packing a spare lightweight head torch (with fresh batteries or a full charge) in your first aid or emergency kit.

This way, if your main headtorch fails or the situation lasts longer than expected, you're not left in the dark. In a scenario where you're
administering first aid or walking off the mountain after sunset, good lighting is invaluable. It is hard to help an injured person when you
literally can't see what you're doing. Many affordable and compact head torches are available; consider throwing one in your
rucksack
as a backup.
In the chaos of an emergency, it's possible to lose or damage your primary navigation tools. Carrying a spare compass (and ensure you have a map) can be a lifesaver if you need to find a quick escape route off the hills or guide mountain rescue to your position.
A compass is small and light, so it makes sense to have a backup. Of course, this only helps if you know how to use it, so make sure your navigation skills are up to scratch. Many hikers also carry a fully charged phone with GPS mapping apps, but remember that batteries and electronics can fail - the compass will never run out of power. Keep it in a secure pocket of your first aid kit or backpack.
If the battery on your mobile phone depletes, take a small power pack to recharge it. Many headtorches have rechargeable batteries, so you can recharge them as well. The reliable one I have used for many years to charge mine and my GoPro, is this one from Anker. There is a smaller, more lightweight version of it, but obviously it has less power. The larger one can power two items at once, whereas the smaller one can only charge one. The larger one, assuming it is fully charged, can recharge an iPhone or equivalent device almost four times, whereas the small one has enough power for almost two full recharges.
By equipping yourself with basic first aid knowledge, carrying a well-thought-out first aid kit, and having the right emergency gear, you significantly enhance your safety margin on the Three Peaks challenge. While we hope you'll never have to deal with more than a minor blister or a bit of fatigue, being ready for the unexpected is all part of responsible adventure planning. Now, with your kit packed and these tips in mind, you can hit the peaks with more confidence, knowing you are better equipped to take care of yourself and your teammates out on the mountains.
Stay safe, have fun, and good luck on your Three Peaks walk!